Unlike Starnet X-Win32 which you can evaluate it free for 30 days, Xming is a free X Window Server for Microsoft Windows (XP/2003/Vista) Operating System (OS) that enables secure graphical access to remote machines that run Linux or Unix OS. After connection to the remote machine is established, you can run the graphical applications from the remote machines in your windows pc desktop.
Assumptions:
- Windows pc where Xming is installed is Windows XP Professional SP3 OS.
- Remote host is SUN Solaris 10 or higher version OS running Java Desktop System (JDS).
- You have login to the NUS network using wired connection. If you are using wireless connection (NUS), please login to the WebVPN first before trying to connect to the remote Linux/Unix host.
Procedures:
- Please download and install Xming 6.9.0.31 or higher version, and Xming-fonts 7.3.0.18 or higher version in your Windows pc.
During installation of Xming, please ensure that you have choose the default options on "Full installation" and "Associate XLaunch.exe with the .xlaunch file extension".
During installation of Xming-fonts, please install Xming-fonts in the same directory as Xming and install all the fonts including 100dpi fonts, DejaVu TTFs and Cyrillic fonts.
You will only need to download and install the alternative Mesa libraries, Xming-mesa (a capable software-only implementation of the OpenGL renderer) if you have an awkward X client that is failing to render.
- After installing Xming and Xming-fonts in your Windows pc, we need to use XLaunch to setup a profile for connecting to the remote host: assume a SUN Fire V480 server running JDS. Please click Start -> All Programs -> Xming -> XLaunch and set the profile settings as shown below:

Please click "One window" option and click "Next >".
Please click "Start a program" and click "Next >".
In Start Program, kindly change the default xterm program to /usr/bin/gnome-session in order to run the JDS in the remote SUN Fire V480 server.
Common program commands include:- For GNOME (RedHat): /usr/bin/gnome-session
- For KDE (SuSE): /opt/kde3/bin/startkde
- For KDE (Fedora Core): /usr/bin/startkde
- For CDE (AIX ): /usr/dt/bin/Xsession
- For CDE (Solaris): /usr/dt/bin/Xsession
- For JDS (Solaris 10): /usr/bin/gnome-session
Then, kindly click to select the "Using PuTTY (plink.exe)". Please enter the remote machine hostname or IP address at the Connect to computer and kindly enter your login userID in the Login as user. Please leave the password blank for security reason. Kindly click "Next >" to continue.

Please click "Next >".

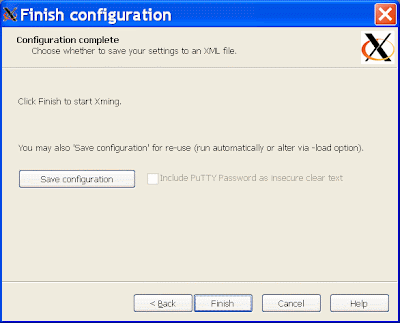
Please click "Save configuration" to save your profile setting so that you can use this profile for future connection to the remote host.
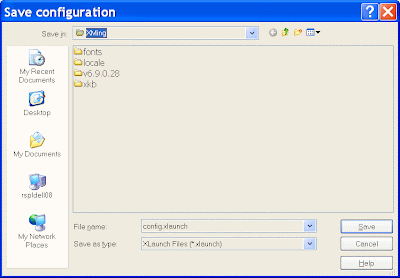
Please change the default config.xlaunch file name to another file name such as "SUNFire_V480.xlaunch" so that you know that this profile is for the SUN Fire V480 server. Kindly click the "Save" button to save your configuration. Finally, please click the "Finish" button to finish your configuration using XLaunch. - Please copy the "SUNFire_V480.xlaunch" file and paste it to your desktop for convenient launching of this profile from your desktop. Please do not copy the "SUNFire_V480.xlaunch" file and paste it as shortcut to your desktop because Xming will fail to work.
- Kindly double-click the "SUNFire_V480.xlaunch" file on your desktop to start connecting to the remote SUN Fire V480 server.
When you connect to a remote host computer for the first time using public-key authentication, the remote host sends your local computer its public key in order to identify itself. Kindly click Yes to store the host key on your local computer. If you save the host key, you do not have to go through this procedure again the next time you login. The host's public key will still be checked with each connection, but this will be done automatically, without user intervention.
You will be prompt to enter your password:

Please enter your password and you will be connected to the remote host and present with the desktop environment (depending on the command you use) of the remote host in your Windows pc.
1) After creating a xxx.xlaunch profile for the remote host using XLaunch, you can simply copy and paste this xxx.xlaunch profile on your desktop. Then, change it to a different name such as yyy.xlaunch to reflect another remote machine profile. After that, edit this new yyy.xlaunch profile with an editor such as WordPad in your Windows pc to change it values so that you do not need to run the XLaunch to create a new profile again. Common values in the yyy.xlaunch profile that you will edit are the Program="/xxx/xxx/xxx", RemoteUser="xxx" and RemoteHost="xxx.xxx.xxx.xxx" values.
2) Please ensure that your firewall setting in your Windows pc allows Xming X Server to have incoming network access to your Windows pc.
3) After connecting to the remote host using Xming, it is recommended that you log out normally from the remote host first before closing the Xming window (by clicking the X
When prompt with the below message:
Xming - Exit ? Exiting will close all screens running on this display. There are currently xx clients connected. Proceed will shutdown of this display/server ?
Kindly click the "exit" button to end your Xming connection.
Reference:
[1] Xming


No comments:
Post a Comment